
Will My Dental Crown Look Natural? Aesthetics, Materials and What to Expect
Will My Dental Crown Look Natural? Aesthetics, Materials and What to Expect
The Aesthetic Anxiety Behind the Clinical Question
Before almost every crown appointment, there is a version of the same conversation. The patient knows the crown is clinically necessary — their tooth is cracked, or it has had a root canal, or it is too broken down to hold a filling. They understand why it needs to be done. What they are less certain about is what they will see in the mirror afterwards.
Will it look obviously artificial? Will the shade be slightly off — noticeable to anyone who looks at them when they smile? Will it have that telltale grey shadow at the gum line that marks an older-style crown? These are not vanity concerns. For most people, how their teeth look is connected to how confident they feel in conversation, in photographs, and in professional settings. A dental restoration that draws attention to itself — however good the clinical outcome — falls short of what modern dentistry can deliver.
The good news is that the gap between what a crown looked like thirty years ago and what it looks like today is enormous. The materials available now, and the techniques for matching them to natural teeth, have transformed what is achievable. This guide explains what dental crowns are made from, how shade matching works, what determines whether a crown looks natural, and what patients can do to ensure the best aesthetic result.
🔑 Key Takeaways
- Modern dental crowns — particularly full zirconia and layered zirconia crowns — are designed to match the appearance of natural teeth so closely that they are effectively invisible in normal social and professional settings.
- The material the crown is made from is the single most important determinant of its appearance. The choice between zirconia, porcelain-fused-to-metal (PFM), and full ceramic depends on the tooth’s position, the biting forces it faces, and the aesthetic priority.
- Shade matching is a precise process — done with shade guides, photography, and laboratory communication — that ensures the crown’s colour, translucency, and surface texture match the surrounding teeth.
- The dark grey line sometimes visible at the gum margin of older crowns is caused by the metal substructure of PFM crowns showing through thinning gum tissue. Modern metal-free crowns eliminate this entirely.
- The fit of the crown — how precisely it seats at the margin where it meets the prepared tooth — is as important as the material for long-term aesthetics and health. A well-fitted crown maintains healthy gum tissue around it.
- For multiple crowns or full-mouth cases, the aesthetic planning process is more detailed — involving trial restorations and sometimes digital smile design to ensure the result is proportionate and natural-looking across the whole smile.
Why Crowns Used to Look Obvious — and Why That Has Changed
The reputation that dental crowns sometimes carry for looking artificial is not entirely unfounded — it is just out of date. For several decades, the dominant crown material was porcelain fused to metal (PFM): a metal coping (a thimble-shaped cap) covered with a layer of tooth-coloured porcelain. The metal substructure provided strength; the porcelain provided appearance.
The problem was layered. The porcelain layer had to be thin enough to fit over the metal coping and still leave the crown at the correct dimensions — which left limited thickness for aesthetic detail. The metal core meant that light could not pass through the crown the way it passes through a natural tooth (a property called translucency), giving the crown a slightly flat, opaque appearance that an experienced eye could detect. And over time, as gum tissue receded slightly with age — as it does around all teeth — the metal margin at the base of the crown became visible as a thin dark grey line at the gum line. This is the classic sign of an older-generation PFM crown.
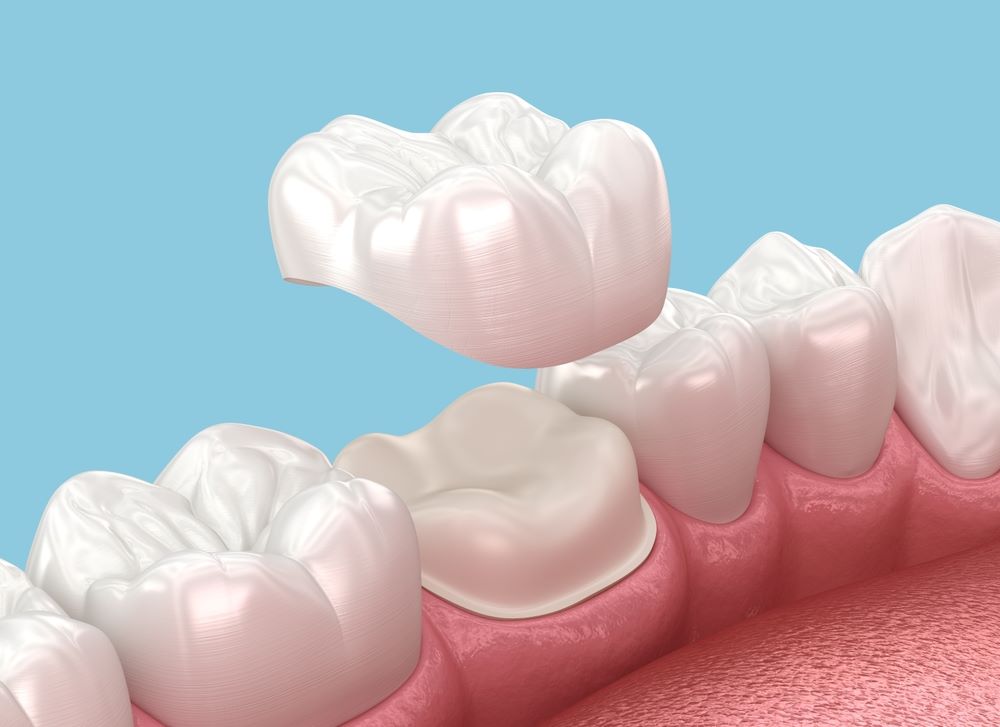
Modern ceramic materials — and in particular zirconia — have addressed all of these limitations. Zirconia is an exceptionally strong ceramic that requires no metal substructure at all. It can be made to the full dimensions of the crown without compromise, allowing the porcelain layer to be thicker and more detailed. In its monolithic (single-material) form, zirconia can be milled to very precise dimensions and then characterised with stains and glazes to replicate the colour gradients and surface texture of natural enamel. There is no metal, no opacity from a metal substructure, and no grey line — ever.
Crown Materials: What the Options Are and What They Mean for Aesthetics
Full Zirconia (Monolithic Zirconia)
Full zirconia crowns are milled from a single block of zirconia ceramic using CAD/CAM technology. They are extraordinarily strong — the material can withstand the very high biting forces generated by molar teeth — and are now available in translucency grades that range from high-strength (slightly more opaque, suited for back teeth under heavy load) to high-translucency (more lifelike, suited for front teeth where appearance is the priority).
The surface of a monolithic zirconia crown is characterised in the laboratory with stains and a glaze that replicates the subtle colour variation of natural enamel — slightly more opaque at the body of the tooth, slightly more translucent towards the biting edge. The result, in experienced hands, is a crown that is indistinguishable from the adjacent natural teeth in normal light and at normal social distances.
- Best suited for: Molar and premolar teeth (back teeth) where strength is paramount; front teeth where aesthetics are critical and high-translucency zirconia is selected.
- Aesthetic rating: Excellent for back teeth; very good to excellent for front teeth with the right zirconia grade.
- Longevity: Among the strongest crown materials available; fracture resistance significantly higher than conventional porcelain.
Layered Zirconia (Zirconia with Porcelain Veneering)
Layered zirconia crowns use a zirconia coping as the substructure and a hand-layered feldspathic porcelain veneering on top. This combination gives the dental technician the greatest control over the final appearance — the porcelain can be built up in layers of different opacity and colour to replicate the complex internal structure of a natural tooth with exceptional precision.
Layered zirconia achieves the most lifelike appearance of any crown material currently available. It is the material of choice for highly visible front teeth where the aesthetic standard is the highest — for example, when crowning the upper central incisors in a patient who has very natural, characterised adjacent teeth that a monolithic crown might not perfectly match.
- Best suited for: Upper front teeth with very high aesthetic demands; cases requiring the closest possible match to heavily characterised natural teeth.
- Aesthetic rating: The highest achievable with current materials.
- Consideration: The porcelain veneer layer is slightly more susceptible to chipping under heavy biting forces than monolithic zirconia. Not ideal for patients with significant bruxism.
Porcelain-Fused-to-Metal (PFM)
PFM crowns remain in use and are a well-established, durable option — particularly for back teeth where the grey margin, if it develops, is less visible. The material is familiar to laboratories, the technique is proven, and the strength of the metal substructure is reliable for heavily loaded molar teeth.
For front teeth or any crown in a cosmetically sensitive area, PFM has been largely superseded by metal-free options in modern dental practice. The opacity of the metal core, the limitation on porcelain thickness, and the risk of the grey margin at the gum line are all avoidable with zirconia alternatives.
- Best suited for: Back teeth in patients where cost is a significant factor and the metal margin is not aesthetically concerning.
- Aesthetic rating: Good for back teeth; limited for front teeth compared to metal-free options.
- Longevity: Very durable substructure; porcelain veneer subject to chipping.
Full Ceramic (Lithium Disilicate / E.max)
Lithium disilicate — marketed commonly under the name IPS e.max — is a full ceramic material offering excellent translucency and a very natural appearance, with strength adequate for front teeth and premolars. It is popular for anterior crowns and veneers because of its optical properties — it transmits and refracts light in a way that closely resembles natural enamel.
Its strength is lower than zirconia, making it less suited for heavily loaded molar positions or for patients who grind their teeth. For front teeth in patients with normal biting forces, it produces excellent aesthetic results.
- Best suited for: Front teeth and premolars; cases where maximum translucency and optical naturalness are the priority.
- Aesthetic rating: Excellent for front teeth.
- Consideration: Not recommended for molars or bruxism patients due to lower fracture resistance compared to zirconia.
| Material | Strength | Aesthetics | Metal-Free | Best Position | Grey Line Risk |
| Full Zirconia (monolithic) | Very High | Very Good to Excellent | Yes | All positions | None |
| Layered Zirconia | High | Excellent | Yes | Front teeth (high demand) | None |
| Lithium Disilicate (e.max) | Moderate–High | Excellent | Yes | Front teeth & premolars | None |
| Porcelain-Fused-to-Metal (PFM) | High (metal core) | Good (back); Limited (front) | No | Back teeth | Yes — over time |
| Full Cast Metal | Highest | Poor (silver/gold colour) | No | Back molars only | N/A |
How Shade Matching Works — and Why It Matters So Much
A crown can be made from the finest material available and still look wrong if the shade is off. Shade matching — the process of selecting and communicating the correct colour for a crown to the dental laboratory — is one of the most important steps in producing a natural-looking result, and one that patients are directly involved in.
The VITA Shade Guide
The standard tool for shade selection is the VITA shade guide — a series of ceramic tabs in the most common natural tooth shades, grouped from bright white through to deeper yellow-brown. The dentist holds these tabs against the patient’s natural teeth in natural light (not the dental operatory light, which distorts colour) and identifies the closest match. This shade is recorded and communicated to the laboratory as the baseline for the crown fabrication.
Natural teeth are not a uniform colour — they are lighter near the cutting edge, slightly darker in the grooves of the surface, and often have subtle characterisation (fine cracks, spots, striations) that a laboratory technician replicates by hand in the porcelain. A shade guide gives the baseline; the full communication between dentist and laboratory gives the detail.
Photography in Shade Communication
In cases where a very precise shade match is required — particularly for visible front teeth next to natural teeth — photographs taken with standardised lighting and a shade tab in frame are sent to the laboratory alongside the impressions or digital scan. These photographs allow the technician to see the exact character of the adjacent teeth: their surface texture, the distribution of translucency, any internal colour variations, and the effect of the patient’s specific skin tone and lip colour on how the shade reads in context.
This level of communication between the dental practice and the laboratory is one of the factors that distinguishes a very natural crown result from an adequate one. At Nova Dental Hospital, crown cases with high aesthetic demands include photographic shade communication as standard.
Digital Shade Technology
Digital spectrophotometers — devices that measure the precise wavelengths of light reflected by the tooth surface — are used in some practices to eliminate the subjective element of visual shade matching. The device takes an objective measurement and produces a shade recommendation that can be communicated digitally to the laboratory. This is particularly useful for cases involving multiple crowns that need to match each other, or when matching a crown to a tooth that has been whitened to a shade outside the standard VITA range.
What Patients Can Do to Help
The shade matching appointment is ideally done before the tooth is prepared — when the natural tooth is still present and at full hydration. A dehydrated tooth (one that has been dried with air) appears significantly whiter than a hydrated tooth and will give a misleading shade reading. Patients who have had teeth whitening treatment should ideally have the whitening completed before crown treatment begins, and then allow two weeks for the shade to stabilise before the crown shade is taken.
The Fit of the Crown: Why the Margin Is as Important as the Material
The margin is the boundary where the crown meets the prepared tooth — the edge where the crown ends and the natural tooth structure begins, at or just below the gum line. The precision of this margin is as critical as the choice of material for both aesthetics and long-term dental health.
What a Well-Fitted Margin Looks Like
A crown with a precise, well-adapted margin sits flush against the prepared tooth without any visible step, gap, or overhang. The gum tissue sits snugly around it, as it would around a natural tooth. There is no space for food or bacteria to collect at the margin, and the crown does not press into the gum tissue in a way that causes inflammation.
In aesthetic terms, a well-fitted margin means the transition between the crown and the natural tooth at the gum line is invisible — the eye sees a continuous tooth shape with no obvious join. This is particularly important for front teeth, where the gum line is visible when speaking and smiling.
What a Poorly Fitted Margin Causes
A crown with an open margin — even a gap of a fraction of a millimetre — allows bacterial penetration, leading to decay of the tooth structure beneath the crown and eventual failure of the restoration. An overhanging margin that extends beyond the prepared tooth pushes into the gum tissue, causing chronic inflammation, bleeding, and eventual gum recession that exposes the margin visibly. Either problem, if left unaddressed, compromises both the aesthetics and the longevity of the crown.
Modern digital impression techniques — using intraoral scanners to capture an exact 3D model of the prepared tooth — have significantly improved margin precision compared to traditional impression materials, which could distort during setting. At Nova Dental Hospital, digital scanning is used for crown cases where it gives the most accurate marginal fit.
The Temporary Crown
Between the preparation appointment and the fit appointment, a temporary crown is placed to protect the prepared tooth, maintain the gum architecture, and allow the patient to assess the shape and fit before the final crown is made. Patients who are having front teeth crowned should use the temporary crown period to evaluate the shape and emergence profile — how the crown emerges from the gum — and raise any aesthetic concerns before the permanent crown is fabricated. Changes to shape are straightforward at the temporary stage; they are not straightforward after the final crown has been made.
Single Crown Aesthetics: Post-Root Canal and Implant Cases
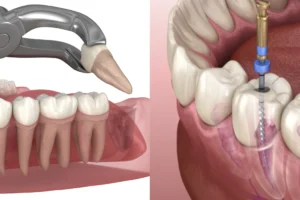
Crown After Root Canal Treatment
The most common reason for a crown on a back tooth is to protect a tooth that has had root canal treatment. Root-treated teeth are more brittle than vital teeth (the pulp tissue that provided internal moisture is no longer present) and are at significant risk of fracture under biting load without crown protection. The crown in this context is primarily a functional restoration, but the aesthetic result is equally important — the patient should not be able to tell, from looking in the mirror, which tooth had the procedure.
For back teeth (premolars and molars), full zirconia is the standard material choice — it provides the strength needed for molar biting forces while delivering a colour match that makes the crown invisible against the natural adjacent teeth. For front teeth that have had root canal treatment, an additional consideration arises: root-treated front teeth can darken over time as breakdown products from the removed pulp diffuse into the dentine. If the tooth has darkened before the crown is placed, the crown shade needs to account for this, and in some cases internal bleaching of the root-treated tooth before crowning improves the baseline shade.
Crown on a Dental Implant
An implant crown — the visible tooth-shaped restoration that attaches to the implant fixture via an abutment — has a slightly different aesthetic context from a crown on a natural tooth. There is no natural tooth structure beneath it and no root providing biological support to the surrounding gum. The shape of the crown’s emergence from the gum — called the emergence profile — must be designed to gently displace the gum tissue in a way that mimics the natural root form, creating the appearance of a tooth that emerges naturally from the gum rather than sitting on top of it.
For this reason, implant crowns in aesthetically sensitive positions — particularly upper front teeth — are among the more technically demanding restorations in dentistry. The material is typically high-translucency zirconia or lithium disilicate; the abutment connecting the crown to the implant is usually ceramic (zirconia) rather than metal, to prevent any grey shadow through the gum tissue. At Nova Dental Hospital, dental implant cases include planning of the emergence profile and abutment material as part of the pre-treatment assessment.
Multiple Crowns and Full-Mouth Cases: When Aesthetic Planning Goes Further
When several crowns are being placed — whether as part of a smile makeover, a full mouth rehabilitation, or the restoration of multiple worn or damaged teeth — the aesthetic planning process is more extensive than for a single crown. The goal is not just to match individual crowns to adjacent natural teeth but to create a result that is proportionate, balanced, and natural-looking across the entire visible smile.
Digital Smile Design
Digital smile design uses photographs and, in some practices, digital software to plan the shape, size, and position of the crowns before any tooth preparation is done. The proposed result is shown to the patient on screen, allowing them to review and adjust the design — the length of the teeth, the width, the gum line symmetry — before committing to the laboratory fabrication. This step is particularly valuable in cosmetic dentistry cases where patient expectations are high and the final result needs to be agreed in advance.
Diagnostic Wax-Up and Trial Restoration
A diagnostic wax-up is a physical model — built in wax on a plaster cast of the patient’s teeth — that represents the proposed final result in three dimensions. This is used to fabricate a set of temporary restorations (sometimes called a trial smile or mock-up) that the patient can wear for a period before any permanent work is done. Wearing the trial restorations allows the patient to assess not just how the crowns look but how they feel to speak with, how they feel under biting load, and whether the shape and size feels right. Any adjustments are made at this stage, and only once the patient and clinician are satisfied is the design transferred to the permanent laboratory restorations.
Gum Level Symmetry
The gum line — the level at which the crowns emerge from the gum tissue — is as important to the final aesthetic result as the crowns themselves. Asymmetric gum levels create an uneven appearance even when the crowns are perfectly made. In cases where the gum levels need adjustment for aesthetic reasons, a minor soft tissue procedure (gum contouring or crown lengthening) may be recommended before the crowns are placed. This coordination between the gum architecture and the crown design is part of the planning process for comprehensive cosmetic dentistry cases.
✅ Quick Tip: How to Get the Best Aesthetic Result From Your Crown
- Complete whitening treatment first — if you plan to whiten your teeth, do it before the crown is made. Crowns cannot be whitened after fabrication, and a crown made to match your pre-whitening shade will appear noticeably darker once your natural teeth have been whitened.
- Have the shade taken before tooth preparation — the prepared tooth stub is a poor reference for shade. The shade should be recorded from the natural tooth before any drilling begins.
- Use the temporary crown to evaluate shape — the temporary phase is the right time to raise concerns about tooth shape, length, or emergence. Communicate clearly with your dentist if anything does not look right before the permanent crown is ordered.
- Provide a photograph of your natural teeth — if you have photographs showing your smile before the tooth became damaged or discoloured, these are useful references for the laboratory when characterising the crown.
- Ask about the material being used — understand whether your crown is zirconia, e.max, or PFM, and why that material has been recommended for your specific tooth and biting pattern.
Common Aesthetic Concerns — Addressed Directly
“I am worried the crown will look obviously white and fake”
Natural teeth are not uniformly white — they range from slightly yellow to slightly grey, with most adult teeth sitting in a moderate yellow range. A crown that is made too white (too high a shade) against natural teeth that have not been whitened will stand out immediately. This is avoidable: the shade matching process selects a colour that matches the adjacent teeth, not an idealised bright white. Patients who want their crown to be whiter than their current natural teeth should consider whitening the natural teeth first and then having the crown made to match the new shade.
“I have seen crowns with a grey line at the gum — will mine look like that?”
The grey line is a feature of older PFM crowns where the metal margin becomes visible through thinning gum tissue. It does not occur with metal-free crowns — zirconia, layered zirconia, or e.max. If your crown is being made from a metal-free material, this concern does not apply. If a PFM crown is being recommended for a visible position, it is worth asking whether a metal-free alternative is appropriate for your case.
“My crown looks slightly different from my natural teeth in photographs”
Photographs — particularly those taken with flash — can reveal differences in a crown that are invisible in normal light, because flash photography eliminates the shadows and subtle light play that make natural teeth and well-made crowns look similar. This is most common with older crowns or with monolithic zirconia crowns that have not been fully characterised. If this is a concern for your existing crown, it is worth raising at your next check-up — in some cases, relayering the surface of a crown with stains and glaze can improve its photographic appearance without remaking the crown entirely.
“I need multiple crowns — will they all look the same?”
Not if the laboratory work is done well. Natural teeth within a smile are not identical — they have individual character, colour variation, and surface detail. A good dental technician will build this variation into a set of crowns so that the result looks like a natural smile rather than a row of identically manufactured teeth. This level of individualisation requires time, skill, and good photographic communication between the practice and the laboratory. It is one of the distinctions between a standard crown result and an excellent one. For full-arch cases or smile makeovers, this planning is built into the treatment at Nova Dental Hospital.
Frequently Asked Questions
FAQ 1: How long does it take to get a crown, and will I be without a tooth during that time?
The standard process involves two appointments: a preparation appointment (where the tooth is shaped and an impression or scan is taken) and a fit appointment (typically one to two weeks later when the crown returns from the laboratory). Between these appointments, a temporary crown is placed over the prepared tooth — so you are never without a tooth in the gap. The temporary crown is functional and reasonable in appearance, though it is not the final aesthetic result. Same-day crowns using in-office CAD/CAM milling are available in some practices; at Nova Dental Hospital, laboratory-fabricated crowns are standard for optimal aesthetic quality.
FAQ 2: Can a crown be made to cover a tooth that is badly discoloured?
Yes — this is one of the scenarios where a crown offers an aesthetic benefit beyond structural protection. A crown covers the entire visible surface of the tooth, so the shade of the underlying tooth structure has no effect on the final colour of the crown. A very dark root-treated tooth, a tooth stained by tetracycline, or a tooth with fluorosis can all be covered with a crown in the desired shade. The one consideration is that the shade of the underlying preparation can influence the perceived shade of a highly translucent crown — the dentist and laboratory account for this in material and shade selection.
FAQ 3: What happens if I am unhappy with how my crown looks when it is fitted?
Before a crown is permanently cemented, it is tried in with a temporary material so you can evaluate the appearance, feel, and bite. This is the moment to raise any concerns — about shade, shape, or how the crown sits at the gum line. If the shade is noticeably off or the shape is not right, the crown can be sent back to the laboratory for adjustment or remake before being cemented. Once a crown is permanently cemented, adjustments to shade or significant shape changes are not possible without remaking the crown. This is why the try-in appointment is important — and why being clear about your expectations from the outset, including at the consultation stage, gives the best outcome.
FAQ 4: Is there a difference between a crown on a back tooth and one on a front tooth in terms of appearance?
Yes — both in material selection and in the degree of aesthetic planning involved. Back teeth are less visible but bear significantly higher biting forces; the priority is strength, and full zirconia is typically the material of choice. Front teeth are highly visible with every smile and conversation; the priority is aesthetics, and the material selection — high-translucency zirconia, layered zirconia, or e.max — is chosen accordingly. The shade matching process is more detailed for front teeth, photographic communication with the laboratory is more important, and the emergence profile (how the crown emerges from the gum) is considered more carefully. A crown on an upper central incisor is one of the most aesthetically demanding single restorations in dentistry.
FAQ 5: Will my crown need to be replaced, and will it still look natural when it does?
Crowns are not permanent — they have a lifespan that depends on the material, the biting forces, the quality of oral hygiene, and the precision of the original fit. A well-made and well-maintained zirconia crown typically lasts fifteen to twenty years before replacement is considered. When a crown is replaced, a new shade matching process is carried out against the current natural teeth (which will have changed slightly in shade over the years), and a new crown is fabricated to the current clinical standards — which means the replacement crown will reflect current materials and technique, not those of fifteen years ago. Regular check-ups at Nova Dental Hospital monitor crown margins, gum health, and wear so that any issues are identified early. Patients who have had crowns placed are welcome to share their experience on our Google Business Profile.
🔑 Key Takeaways
- Modern crown materials — particularly full zirconia and layered zirconia — are specifically engineered to replicate the appearance of natural tooth enamel. In experienced hands, they are effectively invisible.
- The grey line at the gum margin is a feature of older PFM crowns with metal substructures. Metal-free crowns do not produce this effect — ever.
- Shade matching is a process, not a single step. It involves shade guide selection, photography, and laboratory communication, and it is done before tooth preparation for the most accurate result.
- The margin fit — the precision of the boundary between the crown and the prepared tooth — is as important as the material for both aesthetics and long-term health of the gum and tooth.
- For multiple crowns or full-mouth cases, digital smile design and trial restorations allow the patient to review and adjust the planned result before any permanent work is committed to.
- The try-in appointment is the critical moment to raise any aesthetic concerns — shape, shade, gum emergence — before permanent cementation. Once cemented, significant changes require remaking the crown.
Conclusion: A Natural-Looking Crown Is Achievable — the Detail Is in the Process
The question of whether a dental crown will look natural is entirely reasonable, and the honest answer is: with the right material, precise shade matching, a well-fitted margin, and good laboratory communication, a modern crown is effectively invisible in normal life.
What makes the difference between a crown that looks natural and one that draws attention is not luck — it is the cumulative quality of each step in the process: the material choice, the shade communication, the margin preparation, the laboratory craftsmanship, and the try-in before cementation. These steps are not universally consistent across every dental setting, which is why it is worth understanding them as a patient and knowing what questions to ask.
At Nova Dental Hospital, dental crown treatment uses metal-free materials as standard for visible teeth, photographic shade communication for aesthetically demanding cases, and digital scanning for margin precision. Whether you need a single crown after root canal treatment or multiple crowns as part of a larger restoration, a consultation is the right starting point — it gives you a clear picture of the material options for your specific tooth, the shade matching process, and what the result will look like before you commit.
Related posts

Write a Comment
Recent Posts


