
Cavities in Children: How to Spot Them Early and Stop Them Getting Worse
Cavities in Children: How to Spot Them Early and Stop Them Getting Worse
The Most Common Childhood Disease That Most Parents Underestimate
Tooth decay — dental caries — is the most prevalent chronic disease in children worldwide, and it is significantly more common than conditions that receive far more parental attention. In India, studies consistently show decay rates in primary teeth of 50 to 80 percent in school-age children, with many cases going undiagnosed or untreated for years. Yet the standard parental assumption remains: they are only baby teeth, they will fall out anyway.
This assumption is one of the most consequential misunderstandings in children’s health. Cavities in baby teeth cause real pain. They cause infection that can affect the permanent tooth developing beneath. They cause premature tooth loss that leads to crowding in the permanent dentition requiring orthodontic treatment years later. And they are, in the overwhelming majority of cases, entirely preventable — or entirely stoppable in their early stages if caught before they become large.
This guide is written for parents who want to understand what childhood tooth decay actually looks like at each stage, what causes it, how to spot it early at home, what the dentist can do at each stage of the disease, and — most practically — what to do to prevent it from developing or progressing. A paediatric dentist in Gandhinagar who sees children regularly will spot a cavity at the white spot stage that a parent would never notice. But a parent who knows what to look for between appointments can identify early signs that warrant a visit before the next scheduled check-up.
🔑 Key Takeaways
- Early childhood caries — decay in baby teeth — is the most common chronic disease of childhood and affects the majority of Indian children to some degree. It is not inevitable and it is not harmless.
- Decay progresses through distinct visible stages: white spots (early demineralisation), brown or yellow discolouration (enamel breakdown), and visible cavitation (a hole). Each stage can be caught and managed, but earlier intervention is always simpler and less invasive.
- The primary driver of childhood decay is not sugar quantity but sugar frequency and contact time — milk or juice in a bottle at bedtime, prolonged on-demand breastfeeding after teeth have erupted, and frequent sugary snacks between meals.
- Baby teeth matter clinically. They hold space for permanent teeth, support jaw development and speech, and cavities in them cause pain, infection, and premature loss with lasting consequences.
- Most childhood cavities start between the teeth or in the deep grooves of the back teeth — places that are not visible without good lighting and a trained eye. Regular check-ups at a paediatric dentist are the only reliable way to detect them early.
- Prevention is straightforward and highly effective: fluoride toothpaste from the first tooth, correct feeding practices, limiting sugar to mealtimes, and regular dental check-ups from the first birthday.
Why Baby Teeth Get Cavities — The Biology Parents Should Know
Tooth decay is caused by bacteria — specifically, a group of bacteria (principally Streptococcus mutans) that live in the dental plaque on tooth surfaces and metabolise dietary sugars to produce acid. This acid dissolves the mineral structure of the enamel — the hard outer layer of the tooth — in a process called demineralisation. If the cycle of acid attack and natural remineralisation (the tooth’s natural repair process, aided by saliva and fluoride) is repeatedly unbalanced in favour of acid, the enamel progressively weakens, softens, and eventually collapses into a cavity.
Baby teeth are more susceptible to decay than permanent teeth for two structural reasons. First, the enamel of primary teeth is thinner than that of permanent teeth — there is less mineral barrier between the tooth surface and the inner dentine and pulp. Second, the pulp chambers of baby teeth are proportionally larger, meaning decay reaches the nerve sooner. A cavity that would take two to three years to reach the pulp of a permanent molar may reach the pulp of a primary molar in six to twelve months. This is why childhood cavities can progress from a small visible lesion to an abscess surprisingly quickly if left untreated.
The Bacteria Are Transmitted — and Transmission Can Be Reduced
Cavity-causing bacteria are not present in a baby’s mouth at birth — they are acquired, primarily from the primary caregiver. Practices that transfer adult saliva to the baby’s mouth — blowing on food before giving it, sharing spoons, cleaning a dummy by putting it in the parent’s own mouth — transfer the bacteria that colonise the infant’s mouth and establish the foundation for future decay risk. This is not a reason for alarm or guilt — it is information that allows parents to make informed choices. Parents who have a high cavity rate themselves are transmitting a higher bacterial load; this makes the fluoride and dietary protective measures even more important for their children.
What Childhood Cavities Look Like at Each Stage
The most practically useful thing a parent can understand about cavities is that they are visible — if you know what to look for. Decay in baby teeth follows a predictable visible progression, and identifying it at an early stage dramatically changes the treatment required.
Stage 1 — White Spot Lesions (Early Demineralisation)
The earliest visible sign of a cavity is a white spot — a chalky, dull white area on the tooth surface that does not have the same sheen as the surrounding enamel. This white spot is caused by mineral loss from the enamel — the crystalline structure has been partially dissolved by acid, leaving a porous, demineralised zone that appears white because it reflects light differently from healthy enamel.
White spots are most commonly seen on the upper front teeth along the gum margin — the area most vulnerable in children who sleep with a bottle or breastfeed on demand through the night, because the liquid pools around the upper front teeth during sleep. They are also seen in the grooves of the back teeth.
The critical clinical fact about white spots: at this stage, the enamel has not broken down and the cavity can be reversed — without drilling, without a filling — through professional fluoride application, dietary counselling, and improved oral hygiene. This is the only stage at which a cavity can be halted without any drilling. Once the enamel breaks down, treatment requires instrument removal of the decayed tissue.
Stage 2 — Yellow or Brown Discolouration (Enamel Breakdown Beginning)
As demineralisation progresses, the white spot becomes discoloured — turning yellow, brown, or eventually black. The discolouration reflects the organic staining of the demineralised porous enamel by food pigments and bacterial byproducts. At this stage, the enamel surface may still be intact but is significantly weakened and softened. A clinical probe pressed gently on this area will detect a slightly sticky or soft texture that healthy enamel does not have.
This stage requires professional treatment — a filling — but the cavity is still relatively small and the procedure straightforward. The enamel and a small amount of decayed dentine beneath it are removed with a dental instrument, and the space is filled with composite resin or a stainless steel crown depending on the size and location.
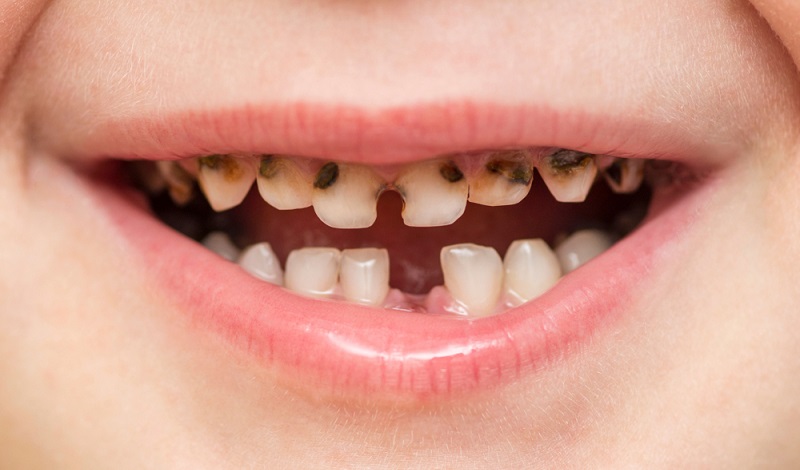
Stage 3 — Visible Cavitation (Hole in the Tooth)
Once the softened enamel collapses under biting load or continues to dissolve, a visible hole — cavitation — appears in the tooth surface. The cavity may appear as a dark pit in the biting surface of a back tooth, or as a visible breakdown of the crown of an upper front tooth. At this stage, the decay has typically reached the dentine and may be approaching the pulp.
Cavities at this stage cause sensitivity to sweet foods and cold, and may cause spontaneous toothache if the pulp is involved. Treatment requires removal of all decayed tissue, which in a back tooth may mean a stainless steel crown to protect the remaining structure; in a front tooth, a composite resin restoration or, if very advanced, a white stainless steel crown.
Stage 4 — Pulp Involvement and Abscess
When decay reaches the pulp — the nerve and blood vessel tissue at the centre of the tooth — bacterial infection of the pulp produces a dental abscess. In children, this presents as facial swelling near the affected tooth, significant pain, fever, and in severe cases, a swelling that extends below the eye or into the neck. A child with a dental abscess requires urgent treatment — drainage of the abscess and either removal of the infected pulp (a procedure called a pulpotomy or pulpectomy) or extraction of the tooth if it cannot be saved.
A baby tooth abscess can affect the permanent tooth developing beneath it. Severe infection in the bone around a baby tooth can damage the enamel of the permanent successor — causing a condition called Turner’s hypoplasia, where the permanent tooth erupts with white or brown marks on the enamel. This is a direct, permanent consequence of an untreated abscess in a baby tooth.
| Stage | What It Looks Like | Is Drilling Needed? | Urgency | Typical Treatment |
| White spot | Chalky white area, no surface break, dull sheen | No — can be reversed | Low — monitor and treat with fluoride | Fluoride varnish; dietary counselling; improved brushing |
| Brown / yellow stain | Discoloured area, surface softening detectable | Yes — small filling | Moderate — treat within weeks to months | Small composite filling |
| Visible cavity | Dark pit or hole visible to the naked eye | Yes — moderate filling or crown | High — treat promptly | Composite filling or stainless steel crown |
| Pulp involvement | Tooth may be broken; child in pain or refusing food | Yes — urgent | Very high — same week or sooner | Pulpotomy or extraction; abscess drainage if swelling present |
Where Cavities Hide — The Places Parents Miss
Most parents check their child’s teeth by looking at the front surfaces — the side you see when the child smiles. Most childhood cavities do not start here. The locations where decay most commonly begins in children are:
Between the Teeth (Interproximal Surfaces)
The contact areas between adjacent teeth are the most common site for childhood decay after the early childhood caries pattern on upper front teeth. Decay between the teeth is not visible from the front or back — it can only be seen on an X-ray or detected by a probe during a clinical examination. Parents who are inspecting their child’s teeth at home will not see interproximal decay until it is large enough to have broken down the visible tooth surface. This is one of the strongest arguments for regular dental X-rays as part of paediatric check-ups.
The Grooves of the Back Teeth (Occlusal Fissures)
The biting surfaces of the back teeth are covered in deep, narrow grooves and pits called fissures. These fissures are deeper and narrower than a toothbrush bristle can penetrate, making them effectively impossible to clean by brushing alone. Food and bacteria accumulate in these grooves and decay initiates within them — producing a dark stain in the groove that progresses downward into the dentine without a visible surface break for a prolonged period. A dark line or pit in the groove of a back tooth is not a stain — it is almost always early decay that requires assessment.
The Gum Margin of Upper Front Teeth
In young children with early childhood caries — the pattern caused by sleeping with a bottle or prolonged night breastfeeding — the decay characteristically begins at the gum margin of the upper front teeth. The earliest sign is a white chalky line running along the gum margin. Parents who look carefully at the upper front teeth from the outside while gently lifting the lip will see this white zone if it is present. This location is frequently missed because parents look at the front face of the teeth rather than the gum margin.
The Real Cause of Childhood Cavities — It Is Not Just Sugar
The relationship between sugar and childhood decay is real but frequently misunderstood. The key variable is not
how much sugar a child consumes, but how often and for how long the teeth are in contact with fermentable carbohydrates. This distinction has significant practical implications for what parents should prioritise.
The Bottle and Bedtime Pattern
The most destructive feeding pattern for baby teeth is milk or juice in a bottle at bedtime or during sleep. When a child falls asleep with a bottle, the liquid pools around the upper front teeth and is not cleared by swallowing. The salivary flow that would normally help neutralise acid and remineralise the enamel is reduced during sleep. The result is prolonged acid contact with the enamel of the upper front teeth — the classic pattern of early childhood caries. The same applies to on-demand night breastfeeding after teeth have erupted, though the pattern tends to be less severe because breast milk pools differently and flow stops when feeding stops.
The solution is simple: no bottle of milk or juice in bed or at sleep. Water is the only safe bedtime drink. Teeth should be brushed after the last feed of the day and before bed.
Frequent Snacking
Every time a child eats or drinks something containing fermentable carbohydrates — including milk, fruit, crackers, and biscuits, not only sweets — the oral bacteria produce acid for approximately 20 to 30 minutes after exposure. A child who snacks continuously throughout the day is maintaining an almost continuous acid environment in the mouth, giving the saliva insufficient recovery time to neutralise the acid and remineralise the enamel. Three meals and two snacks with water between them is significantly less cariogenic than the same food quantity consumed as continuous small amounts throughout the day.
Sticky and Slow-Dissolving Foods
Foods that stick to tooth surfaces — dried fruit, toffee, biscuits, crackers — maintain carbohydrate contact with the teeth for longer than foods that clear quickly. A piece of chocolate, counterintuitively, clears from the mouth faster than a dried mango strip. The stickiness of a food matters as much as its sugar content for decay risk.
Juice and Sweetened Drinks
Fruit juice — including freshly squeezed juice marketed as healthy — is significantly cariogenic. It contains both fermentable sugars and, in the case of citrus juice, intrinsic acid that directly demineralises enamel. The recommendation from paediatric dental guidelines is clear: no juice before age one, juice limited to 120 to 180 ml per day for children aged one to three, and juice given at mealtimes rather than throughout the day. A sipper cup of diluted juice sipped throughout the morning is one of the most efficient ways to produce early childhood caries.
What the Paediatric Dentist Does at Each Stage
Preventive Treatment — Before Cavities Form
The most important thing a paediatric dentist in Gandhinagar does is not treat cavities — it is prevent them. At every check-up, the dentist assesses the child’s caries risk (dietary history, oral hygiene, fluoride exposure, saliva flow, bacteria levels) and tailors the preventive advice accordingly. Professional fluoride varnish application — a concentrated fluoride coating painted onto the teeth — is one of the most evidence-based preventive interventions available, significantly reducing the risk of new cavities in high-risk children. Fissure sealants — a protective coating placed in the grooves of the back teeth — are another highly effective preventive measure covered in detail in a separate blog.
Early Intervention — White Spots and Small Cavities
White spot lesions are treated with concentrated fluoride application, dietary counselling, and improved home hygiene. The dentist may apply a product containing silver diamine fluoride (SDF) — a solution that arrests active decay and prevents progression — on early lesions where the child’s cooperation or age makes drilling difficult or inadvisable. Small cavities that require filling are managed with composite resin, which is tooth-coloured and bonds to the remaining healthy tooth structure.
Moderate to Large Cavities — Fillings and Crowns
Larger cavities in back teeth are often best managed with stainless steel crowns — prefabricated metal crowns that are fitted over the prepared tooth in a single appointment. Stainless steel crowns are the standard of care for large cavities in primary molars because they provide complete coverage of the remaining tooth structure, are extremely durable, and significantly reduce the risk of further breakdown or fracture. They are placed under local anaesthesia and, when properly fitted, are well tolerated by children.
The alternative — composite resin filling in a large cavity — is aesthetically preferable but structurally more vulnerable in primary molars, which bear high biting forces. The dentist will advise on which restoration is most appropriate based on the size and position of the cavity, the child’s age, and how much longer the tooth is expected to remain before natural shedding.
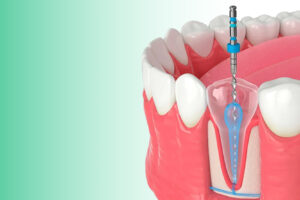
Pulp Involvement — Pulpotomy and Extraction
When decay has reached the pulp, the clinical options are a pulpotomy (removal of the infected pulp tissue from the crown of the tooth, leaving the root canals intact) or extraction. A pulpotomy allows the tooth to be retained — which is clinically preferable because it preserves the space for the permanent successor. Extraction removes the pain and infection but creates a gap that may require a space maintainer to prevent adjacent teeth drifting and crowding the permanent tooth.
⚠️ Signs That Warrant an Urgent Appointment With a Paediatric Dentist
- Visible dark spot, pit, or hole in any tooth — front or back
- A white or brown line running along the gum margin of the upper front teeth
- Child complaining of toothache, or refusing to eat on one side
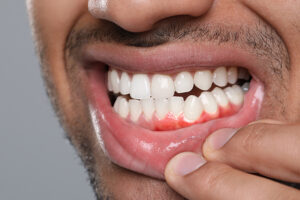
- Swelling of the face, cheek, or gum near any tooth
- A tooth that has become visibly darker than adjacent teeth
- Child waking at night with tooth pain
- Any visible breakdown of a tooth that was previously intact
Prevention at Home — What Parents Should Be Doing by Age
0 to 12 Months
Wipe the gums with a clean damp cloth after feeds from birth. When the first tooth appears, begin brushing twice daily with a soft infant brush and a grain-of-rice smear of fluoride toothpaste. No juice. No bottle in bed. Bring the child for their first dental visit at the first birthday.
1 to 3 Years
Brush twice daily — parent doing the brushing, not supervising the child. Pea-sized amount of fluoride toothpaste from age two. Transition from bottle to cup by 18 months. Water between meals only. Limit juice to mealtimes and keep amounts small. Three meals and a maximum of two planned snacks per day — not continuous snacking.
3 to 6 Years
Continue twice-daily parent-supervised brushing. Begin interdental cleaning where teeth are touching — a small floss pick or child-size floss holder used gently between contact points. Reinforce the rule: no sweet drinks except at mealtimes. Book check-ups every six months — the first X-rays to detect interproximal decay are typically appropriate from around age four to five.
6 to 12 Years
Children begin to take increasing responsibility for brushing from around age six to seven, but parents should continue to supervise and check until at least age nine or ten — most children lack the manual dexterity for consistent thorough brushing before this age. The first permanent molars erupt around age six and should be assessed for fissure sealants at the check-up following their eruption.
✅ The Two Rules That Prevent Most Childhood Cavities
- No bottle or cup of milk, juice, or sweet drink at bedtime or during sleep — water only. This single change eliminates the feeding pattern responsible for the most severe early childhood caries.
- Brush with fluoride toothpaste, twice daily, from the first tooth — with the parent doing the brushing until the child is old enough to do it effectively independently. The combination of fluoride toothpaste and thorough twice-daily brushing is the most evidence-based preventive intervention available at home.
Frequently Asked Questions
FAQ 1: My child has a cavity in a baby tooth. Does it really need to be filled if it will fall out anyway?
Yes — in most cases. A cavity that is left untreated in a baby tooth will progress. It will cause pain when it reaches the nerve. If it abscesses, it can damage the permanent tooth developing beneath it. And a tooth that is lost prematurely from decay creates a space that may require a space maintainer to prevent crowding of the permanent teeth. The exception is a very small cavity in a tooth that is expected to be shed within six months — in that case, the dentist may advise monitoring rather than filling. The decision is always case-specific. Book an assessment at Nova Dental Hospital’s paediatric dentistry for an accurate picture of what your child’s specific cavity requires.
FAQ 2: At what age can a child have a filling?
There is no minimum age for dental treatment — the age at which a filling is placed depends on the clinical need and the child’s ability to cooperate with the procedure. For very young children (under three) with cavities, the dentist may recommend a silver diamine fluoride application to arrest the decay without drilling, or may recommend treatment under general anaesthesia if the cavities are extensive and the child cannot cooperate with chairside treatment. For most children aged three and above, fillings can be placed comfortably with appropriate behaviour management techniques and, where needed, local anaesthesia. The paediatric team at Nova Dental Hospital is experienced in managing children of all ages and temperaments.
FAQ 3: How do I know if my child has a cavity if they are not complaining of pain?
In most cases, you will not — which is precisely why regular dental check-ups are important. Most cavities do not cause pain until they are large or have reached the nerve. A small or moderate cavity is typically symptom-free. Looking at the biting surfaces of the back teeth for dark pits or grooves, and at the gum margin of the upper front teeth for white or brown discolouration, gives some indication — but interproximal cavities (between the teeth) are not visible to a parent at all and require X-rays to detect. A six-monthly check-up with a paediatric dentist is the most reliable way to catch cavities before they become symptomatic.
FAQ 4: Does my child need X-rays at the dental check-up?
Bitewing X-rays — which show the crowns of the teeth and the spaces between them — are recommended for children from around age four to five, when the back teeth have come into contact with each other and decay between them can no longer be visually detected. For children with a low decay rate and no clinical signs of concern, X-rays every 12 to 18 months is appropriate. For children with active decay or high risk, more frequent X-rays allow closer monitoring. The dentist will advise on the appropriate frequency for your child’s specific risk profile at each check-up. The paediatric dentistry team at Nova Dental Hospital makes all radiograph recommendations based on individual clinical need.
FAQ 5: How do I find a good paediatric dentist in Gandhinagar for my child?
Look for a dental clinic in Gandhinagar with specific experience in paediatric dentistry — a team that is comfortable with children of different ages and temperaments, that takes a preventive approach (not just treating cavities but advising on how to prevent the next ones), and that creates a positive, child-friendly environment. Ask specifically how the clinic manages anxious or uncooperative children, and whether they use behaviour management techniques before defaulting to sedation. Nova Dental Hospital’s paediatric dentistry programme covers children from infancy through adolescence. You are welcome to read parent reviews on our Google Business Profile.
🔑 Key Takeaways
- Childhood tooth decay follows a visible four-stage progression — from reversible white spots through to abscess. Identifying it at the white spot stage means no drilling is needed; later stages require progressively more intervention.
- The most common sites for childhood decay — between the teeth and in the grooves of the back teeth — are not visible to parents. Regular X-rays and clinical examination are the only way to detect them early.
- The primary driver of childhood caries is not sugar quantity but frequency and contact time — especially the bedtime bottle and continuous snacking patterns.
- Baby teeth matter. Untreated decay causes pain, infection, premature tooth loss, and can permanently damage the developing permanent tooth beneath.
- Treatment at every stage is available and effective — from fluoride varnish at the white spot stage through to pulpotomy for pulp involvement. Earlier always means simpler.
- Two home habits prevent the majority of childhood cavities: no sweet drinks at bedtime or during sleep, and twice-daily brushing with fluoride toothpaste with the parent doing the brushing.
Conclusion: Catch It Early — the Difference Between a Fluoride Application and a General Anaesthetic
The gap between catching a cavity at the white spot stage and catching it at the abscess stage is enormous — in terms of what treatment the child needs, how much it costs, how distressing the experience is for the child and parent, and what the long-term consequences are for the permanent teeth.
Childhood tooth decay is common, but it is not inevitable and it is not harmless. The combination of correct feeding practices from infancy, twice-daily fluoride toothpaste brushing, limiting sugar to mealtimes, and regular check-ups at a paediatric dentist in Gandhinagar prevents the vast majority of cases. For children who have already developed early decay, the earlier it is identified and treated the simpler the intervention — and the better the long-term outcome for both the baby teeth and the permanent teeth growing beneath them.
Book a paediatric dental check-up for your child at Nova Dental Hospital. Whether it has been six months or three years since the last visit, the appointment gives you a clear picture of where your child’s dental health stands — and a specific plan for keeping it there.
Related posts

Write a Comment
Recent Posts


